
Javascript Blockchain Coding: The Many different Languages You Need!
Along with HTML and CSS it is one of the three core technologies in World Wide Web Content Production. Javascript is usually used to create highly interactive webpages. So, now we will see how to create a very simple blockchain using Javascript.
Suppose, we want to create a simple blockchain in Javascript. Before we do so, there are certain things that we need to address.
What is a blockchain and how exactly does it work…code-wise?
A blockchain is basically a chain of blocks which contain data. It is basically a glorified linked list. However, what makes it so special? A blockchain is immutable.Meaning, once a data goes inside a block, it can never be changed. How does a blockchain attain immutability? It is because of a simple but ingenious mechanism called “hashing”. Checkout the diagram below:
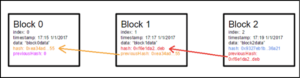
Image Courtesy: Lauri Hartikka medium article
Each block is connected to the previous block via a hash pointer which contains the hash of the previous block. So, how does this make the chain immutable?
One of the most fascinating properties of cryptographic hash functions is that if you even change the input by a little bit, it can greatly affect the output hash. Eg. Check this out:
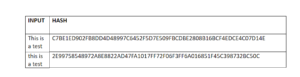
Just changing the first “T” from upper to lower case drastically changed the output hash so much.
So, how does this affect the blockchain?
Each block is connected to the previous one via the hash pointer. So, if someone were to tamper the data in a block, it would change the hash drastically and as a result, end up affecting the whole chain (as all the blocks are linked). This would freeze up the chain which is an impossibility and hence the blocks remain unchanged.
So, how do we make a block? What does a simple block consist of? In our simple cryptocoin that we are going to make (Let’s call it “BlockCoin”), each block will have the following pieces of information:
- Index: To know the block number.
- Timestamp: To know the time of creation.
- Data: The data inside the block.
- Previous Hash: The hash of the previous block.
- Hash: The Hash of the current block.
Before we continue. You need to understand certain terms that we are going to use in our program:
- this: The “this” keyword is invoked inside a function and enables you to access the values inside a specific object that calls that particular function.
- Constructor: A constructor is a special function which can help create and initialize an object within a class. Each class is restricted to only one constructor.
Now that that’s done, let’s start making our block.
Creating the Block
[sourcecode language=”plain”]const SHA256 = require("crypto-js/sha256");
class Block
{
constructor(index, timestamp, data, previousHash = ”)
{
this.index = index;
this.previousHash = previousHash;
this.timestamp = timestamp;
this.data = data;
this.hash = this.calculateHash();
}
calculateHash()
{
return SHA256(this.index + this.previousHash + this.timestamp + JSON.stringify(this.data)).toString();
}
}[/sourcecode]
Code Analysis
Ok, so this right here is out block. So, in the first line of the code we called the crypto-js library because the sha256 hash function is not available in JavaScript.
Next, we invoked a constructor inside the class to call for objects which will have certain values. The thing that probably catches your eye is the calculateHash() function. Let’s see what exactly is it doing.
In a block, we take all the contents and hash them to get the hash of that particular block. We are using the JSON.stringify function to turn the data of the block into string to hash it.
Ok, so we have the block ready and good to go. Now let’s connect the blocks together into a blockchain.
Creating the blockchain
[sourcecode language=”plain”]class Blockchain
{
//Section 1 Genesis block creation
constructor()
{
this.chain = [this.createGenesisBlock()];
}
createGenesisBlock()
{
return new Block(0, "01/01/2017", "Genesis block", "0");
}
//section 2 adding new blocks
getLatestBlock()
{
return this.chain[this.chain.length – 1];
}
addBlock(newBlock) {
newBlock.previousHash = this.getLatestBlock().hash;
newBlock.hash = newBlock.calculateHash();
this.chain.push(newBlock);
}
//section 3 validating the chain
isChainValid()
{
for (let i = 1; i < this.chain.length; i++)
{
const currentBlock = this.chain[i];
const previousBlock = this.chain[i – 1];
if (currentBlock.hash !== currentBlock.calculateHash()) {
return false;
}
if (currentBlock.previousHash !== previousBlock.hash)
{
return false;
}
}
return true;
}
}[/sourcecode]
Code Analysis
Ok, so a lot of things are going on in the chain above, let’s break it down to sections.
Section 1: The Genesis Block
What is the genesis block?
The genesis block is the first block of the blockchain, and the reason why it is special is because while every bock points to the block previous to it, the genesis block doesn’t point at anything. So, the moment a new chain is created, the genesis block is invoked immediately. Also, you can see a “createGenesisBlock()” function wherein we have given the data of the block manually:
[sourcecode language=”plain”]createGenesisBlock()
{
return new Block(0, “01/01/2017”, “Genesis block”, “0”);
}[/sourcecode]
Now that we have built the genesis block, let’s build the rest of the chain.
Section 2: Adding The Blocks
Firstly, we will need to know what the last block in the blockchain currently is. For that we use the getLatestBlock() function.
[sourcecode language=”plain”]getLatestBlock()
{
return this.chain[this.chain.length – 1];
}
Now that we have determined the latest block, let’s see how we are going to add new blocks.
addBlock(newBlock) {
newBlock.previousHash = this.getLatestBlock().hash;
newBlock.hash = newBlock.calculateHash();
this.chain.push(newBlock);
} [/sourcecode]
So, what is happening here? How are we adding the blocks? How are we checking if the given block is valid or not?
Remember the contents of a block?
A block has the hash of the previous block right?
So, what we are going to do here is simple. Compare the previousHash value of the new block with the hash value of the latest block.
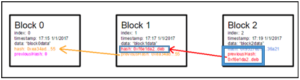
Image Courtesy: Lauri Hartikka medium article
If these two values match, then this means that the new block is legit and it gets added to the blockchain.
Section 3: Validating the Chain
Now, we need to check that nobody has been messing with our blockchain and that everything is stable.
We are using the “for” loop to go from the block 1 to the last block. Genesis block is block 0.
[sourcecode language=”plain”]for (let i = 1; i < this.chain.length; i++)
{
const currentBlock = this.chain[i];
const previousBlock = this.chain[i – 1];
In this part of the code we are defining two terms, current block and previous block. And now we are simply going to find the hash of these two values.
if (currentBlock.hash !== currentBlock.calculateHash()) {
return false;
}
if (currentBlock.previousHash !== previousBlock.hash)
{
return false;
}
}
return true;
} [/sourcecode]
If the “previousHash” of the current block is not equal to the “Hash” of the previous block, then this function will return False, else it will return True.
Using the blockchain
Now, we are going to finally use the blockchain to create our BlockCoin.
- let BlockCoin = new Blockchain();
- BlockCoin.addBlock(new Block(1, “20/07/2017”, { amount: 4 }));
- BlockCoin.addBlock(new Block(2, “20/07/2017”, { amount: 8 }));
And that’s it!
So what happened here?
We created a new cryptocurrency based on the blockchain and named it BlockCoin. By invoking this new object, I activated the constructor, which in turn created the Genesis block automatically.
We simply added two more blocks to it and gave them some data.
It is that simple.


Post a Comment
You must be logged in to post a comment.